Your Secret to a Flawless, Streak-Free Tan
A tanning mitt applicator is a soft, reusable tool designed to distribute self-tanner evenly across your skin while protecting your hands from staining. Here's what you need to know:
Quick Answer: What Is a Tanning Mitt Applicator?
- What it is: A velvet or microfiber mitt you wear on your hand to apply self-tanner
- How it works: Distributes tinted tanning water evenly in smooth, controlled strokes
- Key benefits: Streak-free finish, stain-free hands, less product waste, faster application
- Best for: Water-light formulas like tinted tanning sprays and drops
- Maintenance: Washable, reusable, lasts for months with proper care
A perfect at-home tan isn't just about the formula—it's about the tools. You can have the best self-tanner in the world, but if you're applying it with your bare hands or a paper towel, you're setting yourself up for streaks, orange palms, and uneven color. That's where a quality tanning mitt changes everything.
The right mitt gives you control. It blends water-light formulas like our Life Proof Tan seamlessly, prevents product from pooling or dripping, and keeps your hands completely clean. No more scrubbing brown stains off your palms or waking up to patchy ankles. Just smooth, even color that looks natural on every skin tone.
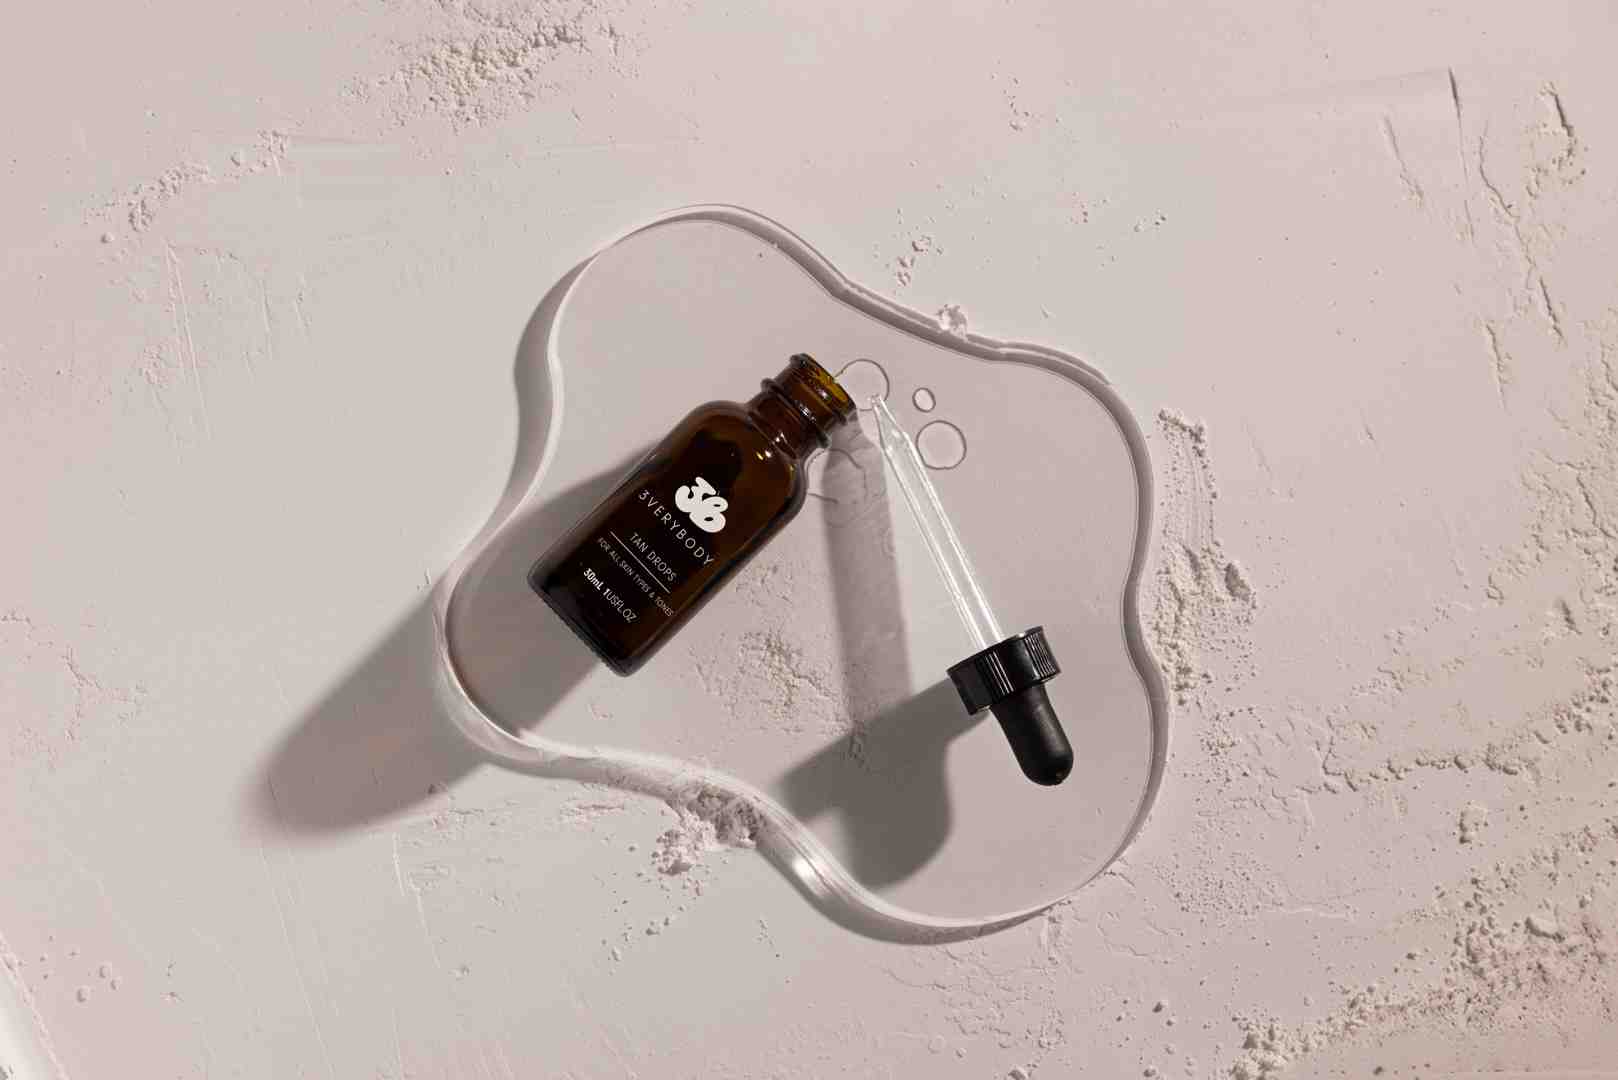
I'm Emmy Bre, founder of 3VERYBODY, and I've tested nearly every self-tanner and tanning mitt applicator on the market over the past decade before creating our own. Our double-sided, washable mitt was designed specifically for water-based formulas that dry fast and stay put—no streaks, no stickiness, no compromise.

Tanning mitt applicator basics:
Why a Mitt Is Your Tan's Best Friend
If you've ever woken up to orange palms, streaky ankles, or a patchy tan that looked nothing like the glowing result you wanted, you already know: the tool you use matters just as much as the formula. A tanning mitt applicator isn't just a nice-to-have—it's the difference between a DIY disaster and a salon-quality tan at home.
Think of your mitt as your control center. It gives you the precision to blend water-light formulas seamlessly, the barrier to keep your hands clean, and the soft surface to buff everything into a natural-looking finish. Without it, even the best self-tanner can pool, streak, or absorb unevenly.
 next to a streaky, unevenly tanned arm (applied with bare hands). - tanning mitt applicator")
Mitt vs. Hands: Even Distribution, No Stained Palms
Let's start with the most common mistake: applying self-tanner with your bare hands. The result? Stained palms, orange knuckles, and a dead giveaway that your tan isn't real. And trust me, scrubbing that off is no fun. A tanning mitt applicator protects your hands completely, so you can apply your tan without worrying about how to get fake tan off hands afterward.
But it's not just about keeping your hands clean. Your palms have natural creases and contours that create uneven pressure, which leads to patchy application—especially on larger areas like your legs or back. A mitt has a flat, uniform surface that distributes product thinly and consistently. You get smooth, even coverage with every stroke, and the soft texture lets you buff the formula into your skin for a blended, natural finish.
Mitt vs. Paper Towels or Cloths: No Slipping, Better Blending
Some people try to get creative with paper towels, old cloths, or makeup sponges. The problem? They absorb way too much product, wasting your self-tanner and leaving you with splotchy, uneven color. They also shed fibers, slip around in your hand, and don't have the soft texture you need to blend properly.
A quality tanning mitt applicator is designed to glide over your skin without soaking up all your product. The velvety surface picks up just the right amount of formula and distributes it evenly, so you use less and get better results. Plus, the secure fit means no slipping, even when you're working on tricky spots like your shoulders or the backs of your thighs.
Why a mitt is essential for water-light, quick-dry formulas like Life Proof Tan
Our Life Proof Tan is a water-light, quick-dry formula that's never sticky or orange. But because it's thin and absorbs fast, you need to apply and blend it efficiently—and that's where a mitt becomes absolutely essential.
If you try to apply our Tinted Tanning Water with your hands, it'll absorb into your palms before you even get it onto your body. Or worse, it'll dry in streaks before you have a chance to blend. A mitt gives you the perfect surface to distribute the product quickly and evenly, buffing it into your skin before it sets. The result? A flawless, natural-looking tan that works on every skin tone, from very fair to deep.
Still wondering if you really need one? We break it down in detail here: Do I Need to Use a Tanning Mitt to Apply Self-Tanner?
Choosing the Best Tanning Mitt Applicator for You
Not all tanning mitt applicators are built the same. I learned this the hard way after testing dozens of mitts over the years—some left me with streaks, others fell apart after a few washes, and plenty just didn't work with the water-light formulas I was developing. When we created the 3VERYBODY Mitt, I wanted something that would actually deliver on the promise of a flawless tan every single time.
The right mitt makes all the difference, especially when you're working with quick-dry, water-based formulas like our Life Proof Tan. You need a tool that can handle the thinner consistency, distribute product evenly, and stand up to regular use without falling apart. Here's what to look for when you're choosing your perfect mitt.
Key Features of a High-Quality Tanning Mitt Applicator
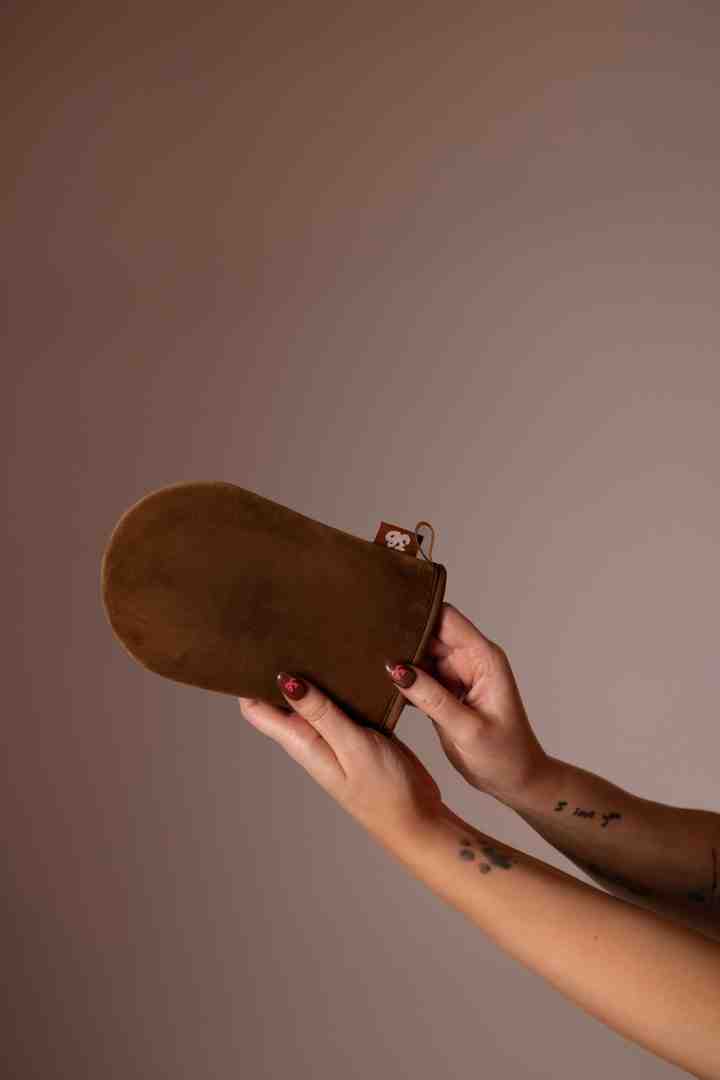
The material makes or breaks your application. You want a velvet-soft surface—think fine velour or microfiber—that glides across your skin without dragging or catching. This soft texture isn't just about comfort. It's what allows you to buff the product into your skin rather than just wiping it on, which is the secret to that natural, blended finish. When a mitt is too rough or textured, you'll see streaks. When it's too smooth, the product slides around instead of absorbing. That velvety-soft sweet spot is what you're after.
A water-resistant barrier is non-negotiable. This internal lining is what keeps your hands completely clean and stain-free, no matter how much product you're working with. Without it, self-tanner will seep through the fabric and you'll end up with those tell-tale orange palms we're all trying to avoid. It's a simple design feature that makes a world of difference.
Double-sided design gives you more control. With two working surfaces, you can use one side for your body and flip to the clean side for delicate areas like your hands and feet. This is especially helpful when you're blending around your wrists and ankles—you want barely any product there, and a clean side of the mitt gives you that light, natural touch. Plus, you can alternate sides between washes, which extends the life of your mitt.
Washable and reusable mitts are worth the investment. A quality tanning mitt applicator should last you months, not weeks. Our mitt is designed to be rinsed or machine washed after each use, so you always have a clean tool ready for your next application. This isn't just better for your wallet—it's better for the planet. And when your mitt is clean, your tan won't transfer to your clothes or sheets. (More on keeping your color where it belongs: Tan That Doesn't Transfer.)
The construction should be designed for even, streak-free application. The best mitts are engineered to hold just the right amount of product without absorbing too much or letting it pool. This is what prevents those dark patches and light spots that make a tan look obviously fake. Every stroke should distribute the product consistently, and that comes down to how the mitt is built.
The Best Mitt for Water-Based Tanners
Water-light formulas like our Tinted Tanning Water are a game-changer for at-home tanning—they're quick-drying, never sticky, and deliver beautiful, natural color. But their thinner consistency means you need a mitt that can handle them properly.
Water-based tanners need a mitt that prevents drips and ensures even saturation. Because these formulas are more liquid than traditional lotions or creams, they can run or pool if you're not using the right tool. A good mitt acts like a controlled sponge, holding the tinted tanning water just long enough to transfer it smoothly to your skin. This is how you avoid those lighter spots where the product didn't quite reach or darker patches where too much product sat for too long.
The 3VERYBODY Tanning Mitt was designed specifically for our Life Proof Tan. It's double-sided with a velvety-soft texture that buffs in our water-light formula for a flawless finish. The water-resistant barrier keeps your hands completely clean, and the overall design gives you optimal control for even application—no matter which part of your body you're tanning. It's also completely washable and reusable, so you can use it again and again without any loss in performance.
Our mitt works seamlessly with our quick-dry Life Proof Tan, which is enriched with argan oil, cucumber oil, caffeine, and guarana extract. It's vegan, cruelty-free, and free from parabens and sulfates—and it's sweat and transfer-resistant once dry. A thinner, water-light layer blends cleaner, dries faster, and looks natural from very fair to deep skin.
It's also part of the complete 3VERYBODY Kit. The kit brings together everything you need for salon-quality results at home: our Tinted Tanning Water (Life Proof Tan), customizable Tanning Drops, and the essential Tanning Mitt. Together, these tools ensure you achieve a flawless, non-orange, non-sticky tan every single time—no guesswork, no streaks, no orange palms.
How to Get a Perfect, Even Tan Every Time
A flawless tan isn't about luck—it's about technique. With our quick-dry Tinted Tanning Water and your tanning mitt applicator, you're minutes away from a natural, streak-free glow that looks like you were born with it. The secret is in the prep and the method. Here's exactly how to get it right every single time.

Prep Your Skin
Think of your skin as a canvas. The smoother and cleaner it is, the better your tan will look—and last.
Start with clean, dry skin. This means no lotions, no oils, no deodorant. Anything on your skin creates a barrier that blocks the self-tanner from absorbing evenly. You'll end up with light spots or patchy areas that fade fast. A fresh, clean base lets the product sink in uniformly for color that develops beautifully.
Exfoliate Before Self-Tan at least 24 hours before you plan to tan. This is hands-down the most important prep step. Exfoliating removes dead skin cells that can grab onto self-tanner and create dark, uneven patches. Use a gentle scrub or exfoliating mitt, focusing on rough areas like knees, elbows, and ankles. Your skin should feel smooth and soft, not flaky or dry.
If you need to shave or wax, do it 24 hours prior. This gives your pores time to close back up. If you tan right after hair removal, the product can settle into open pores and create tiny dark dots that look like stubble. Not cute.
Moisturize your dry spots right before you tan. Your knees, elbows, ankles, and wrists are drier than the rest of your body, which means they absorb more product and turn darker faster. A light layer of moisturizer on these areas creates a subtle barrier that dilutes the tanner just enough for a natural, even blend. You're not blocking the tan—you're softening the transition.
How to Use Your Tanning Mitt Applicator for a Flawless Finish
Now comes the easy part. Your tanning mitt applicator is designed to make this foolproof.
Spritz Life Proof Tan Tinted Tanning Water directly onto the mitt—not onto your skin. This gives you total control and prevents drips or missed spots. Start with 2-3 pumps per body section. You don't need to drench the mitt; just enough product to cover a small area of the surface is perfect.
Apply in long, sweeping motions. Start at your ankles and work your way up. Long, fluid strokes help distribute the product smoothly without harsh lines. The motion should feel natural, like you're painting your skin with even, confident strokes.
Use gentle circular motions to blend. After your initial sweep, buff the product into your skin with soft circles. This is where the velvety surface of our mitt really shines—it melts the tanner into your skin for an airbrushed, seamless finish. No streaks, no patches, just smooth, even color.
Work in sections to stay focused and thorough. Do one leg, then the other. Then your torso, arms, and so on. Our Life Proof Tan is quick-dry, so working section by section ensures you blend everything beautifully before it sets. You won't miss a spot, and you won't rush.
Save your hands and feet for last. These areas are tricky and can easily look over-tanned. Flip your mitt to the clean side and use only the residual product left on it—or apply the tiniest amount of fresh tanner. Lightly glide the mitt over the tops of your hands and feet, blending gently around your knuckles, between your fingers and toes, and up toward your wrists and ankles. The goal is a light, natural fade that doesn't scream "self-tanner."
Let it dry for a few minutes, then wear loose clothes. Our formula dries fast, so you'll only need to wait a couple of minutes before getting dressed. Choose something loose and breathable to avoid friction while the tan develops. After the recommended development time (usually a few hours), take a quick lukewarm rinse to wash off the cosmetic bronzer. Pat your skin dry, and moisturize daily to keep your tan looking fresh and fading evenly.
For more tips on nailing the technique, check out our Self Tanner Application Tips and our guide to achieving a Self-Tan Without Streaks. You've got this.
Keep Your Mitt Clean and Ready for Your Next Glow-Up
Your tanning mitt applicator is a small investment that makes a huge difference in your tan, and like any tool you love, it deserves proper care. A clean mitt isn't just about hygiene—it's the secret to consistently flawless, streak-free results every single time you tan. Plus, with the right maintenance, our washable, reusable 3VERYBODY mitt will last you months, making it both cost-effective and sustainable.
Cleaning and Storing Your Mitt
The good news? Keeping your mitt in perfect condition is incredibly simple. The golden rule is don't let self-tanner dry on it. As soon as you finish applying your tan, head straight to the sink and rinse your mitt under running water. This prevents the cosmetic bronzer from setting into the fibers, which makes cleaning so much easier.
For a thorough clean, use lukewarm water and a gentle soap—even a mild shampoo works beautifully. Gently rub the mitt against itself or use your fingers to work the soap through the velvety surface. You'll see the tinted product wash away, leaving your mitt fresh and ready for next time. Once you've rinsed all the product out, gently squeeze the mitt to remove excess water. Here's a key tip: don't wring or twist the mitt harshly, as this can damage the delicate fibers or compromise the internal water-resistant lining that keeps your hands stain-free.
Now just air dry your mitt naturally. Hang it over a towel rack, drape it on a clothesline, or even lay it flat on a clean towel—whatever works for your space. Just avoid direct sunlight or high heat sources like radiators, as these can degrade the material over time. Make sure it's completely dry before you tuck it away to prevent any mildew or mustiness.
For a deeper dive into mitt maintenance, we've got you covered here: How to Clean Your Tanning Mitt.
Even with the best care, your mitt won't last forever. You'll know it's time to replace your mitt when you notice the velvety surface starting to fray or thin out, or if it loses that soft, smooth texture that makes application so effortless. A stiff or rough mitt can lead to streaks, which defeats the whole purpose. If you start noticing self-tanner seeping through to your hands despite the barrier, or if your mitt retains a stubborn odor or staining even after cleaning, it's time for a fresh one. Our 3VERYBODY mitt is built for durability, but regular use means eventually treating yourself to a replacement ensures you continue achieving that perfect, streak-free glow every time.
Your Tanning Mitt Questions, Answered
We know you might have a few more questions about making the most of your tanning mitt applicator. Here are some quick answers to the most common queries we hear.
Can I use a tanning mitt with all types of self-tanners?
Yes, a tanning mitt applicator is incredibly versatile and can be used with almost all types of self-tanning products. Whether you prefer lotions, sprays, or waters, a mitt will significantly improve your application.
Especially effective with sprays and waters like Life Proof TanOur Tinted Tanning Water, Life Proof Tan, is a perfect example where a mitt shines. Its water-light consistency means a mitt helps prevent drips and ensures incredibly even distribution. For self-tanning sprays, applying the product to the mitt first (or spraying the skin and blending immediately with the mitt) gives you better control and prevents overspray.
Also works for Tanning Drops mixed with moisturizerIf you're using our Tanning Drops, which are designed to be mixed with your favorite moisturizer, serum, or oil, you can still use a mitt. Apply the mixed product to your skin as usual, then use the mitt to gently buff and blend for an extra layer of streak-free insurance.
Why water-light formulas are a great matchWhile mitts work with all types of self-tanners, they are particularly advantageous for thinner, water-light formulas. A thinner, water-light layer blends cleaner, dries faster, and looks natural from very fair to deep skin. They help to control the product, preventing it from soaking into your skin too quickly or dripping, which can be common with less viscous products. This ensures a smooth, even application every time.
How do I tan my back with a mitt?
Tanning your back can be one of the trickiest parts of the self-tanning process, but with a little ingenuity and your tanning mitt applicator, it’s totally doable.
The reach-around methodFor most of your back, you can use the mitt on your hand and reach around as best as you can. Use long, sweeping motions and try to keep the pressure even. This works well for the upper and middle back.
Using a hanger as a hackFor those hard-to-reach spots in the center of your back, a simple clothes hanger can be your best friend. Drape your mitt over the end of a hanger (a velvet-flocked hanger works great for grip), secure it with a rubber band if needed, apply product to the mitt, and use the hanger to maneuver the mitt across your back. This extends your reach and allows for a surprisingly even application.
Back applicators as an alternativeIf you regularly struggle with your back, there are specialized back applicators available on the market. These usually consist of a long strap or a mitt attached to a long handle, designed specifically to help you reach every inch of your back. While we don't sell these, they can be a great addition if you're a frequent self-tanner.
Are expensive tanning mitts worth the price?
The typical price range for a tanning mitt applicator is generally between $6 and $15. So, are the pricier options truly worth the investment?
Price vs. quality: Durability, material, water-resistant liningIn many cases, yes, a slightly higher-priced mitt can be a worthwhile investment. The difference often comes down to the quality of the materials, the construction, and features like a robust water-resistant lining. Cheaper mitts might use thinner fabric that frays quickly, absorb too much product, or have a less effective internal barrier, leading to stained hands. A high-quality mitt, like ours, is designed with a velvety-soft texture for smooth application and a durable water-resistant lining that truly protects your hands.
A good mitt is a small investment for a much better tanConsidering the overall cost of self-tanning products, spending a few extra dollars on a durable, effective mitt is a small investment that yields significant returns. It ensures your expensive self-tanner is applied flawlessly, lasts longer, and prevents costly mistakes like streaks or stained hands. Given that many mitts are washable and reusable, they are a sustainable and cost-effective solution in the long run. If you're a regular self-tanner, a quality mitt will pay for itself many times over in terms of superior results and peace of mind.
The Final Word on Flawless Application
Here's the truth: a quality tanning mitt applicator is the non-negotiable tool that separates an okay tan from a perfect, streak-free glow. It protects your hands, ensures even coverage, and makes the whole process faster and cleaner. Without it, even the best self-tanner in the world won't give you that salon-quality finish you're after.
I've spent the last decade testing every self-tanner and mitt I could get my hands on, and I can tell you this—the right mitt changes everything. It's not just about keeping your palms clean (though that's a huge bonus). It's about control, precision, and the ability to buff a water-light formula into your skin so seamlessly that it looks like you were born with that glow.
Our 3VERYBODY Tanning Mitt was designed specifically to work with our quick-dry, sweat/transfer-resistant formulas. When you pair it with our water-light Life Proof Tan, you're working with a system that's been tested and perfected. A thinner, water-light layer blends cleaner, dries faster, and looks natural from very fair to deep skin—no stickiness, no orange undertones, no compromise.
The mitt gives you the control you need to apply our Tinted Tanning Water in long, sweeping motions, buff it in with gentle circles, and blend those tricky areas like hands and feet with the clean side. It ensures every drop of product goes exactly where you want it, not into your palms or onto your bathroom floor. It's a small investment that transforms your entire self-tanning routine.
Ready to experience what a truly flawless tan feels like? The 3VERYBODY Kit brings together everything you need: our Tinted Tanning Water, customizable Tanning Drops, and the essential Tanning Mitt. It's your complete system for a salon-worthy tan at home, every single time.