Should You Use a Tanning Mitt or Bare Hands to Apply Self-Tanner?
When deciding whether to use a tanning mitt or your bare hands, the main trade-off comes down to protection versus tactile feel. Applying self-tanner with your hands gives you direct sensory feedback, making it easy to feel where the skin is dry or where liquid has already spread. However, bare skin absorbs active tanning ingredients rapidly, which often leads to dark, stained palms, stained cuticles, and orange knuckles.
Using a specialized applicator creates an impermeable physical barrier between the product and your palms. It also covers a larger surface area per stroke, helping you learn How to Avoid Streaks or Patchiness When Applying Self-Tanner. In online community discussions, such as this thread on Tanning - Gloves Vs Bare Hands Vs Mit - beautyheaven, users repeatedly highlight that while hands offer control, they almost always require intense scrubbing afterward to prevent uneven hand discoloration.
| Application Method | Pros | Cons | Best Used For |
|---|---|---|---|
| Tanning Mitt | Prevents hand stains, buffers formula for smooth blending, reusable | Absorbs a small portion of product | Full-body application, liquid tanning waters, lotions |
| Bare Hands | Maximum sensory control, zero extra tools required | High risk of stained palms/cuticles, requires constant hand washing | Emergency application, very small touch-ups |
| Rubber/Latex Gloves | Zero product waste, clean barrier, excellent dexterity | Can push product around if moved too slowly | Quick application, detailed body sectioning |
| Inside-Out Sock | Readily available at home, soft textured fabric | Absorbs more formula, single-use per laundry cycle | Sudden emergencies when no mitt is available |
How Product Absorption Affects Color Intensity and Coverage
Different application materials interact with self-tanning formulas in distinct ways. Skin and porous fabrics absorb liquid, whereas non-porous materials push liquid across the skin's surface.
Plush velvet or microfiber fabric applicators hold onto a controlled amount of product and release it gradually as you glide across the skin. As discussed in our Tanning Mitt Guide 2026, this gradual release acts as a built-in cushion, preventing sudden pooling or dark patches. In contrast, non-porous barriers like gloves transfer 100% of the product directly to your skin for maximum color payoff, but require faster blending to prevent uneven lines.
Why Stained Palms and Knuckles Happen (And How to Prevent Them)
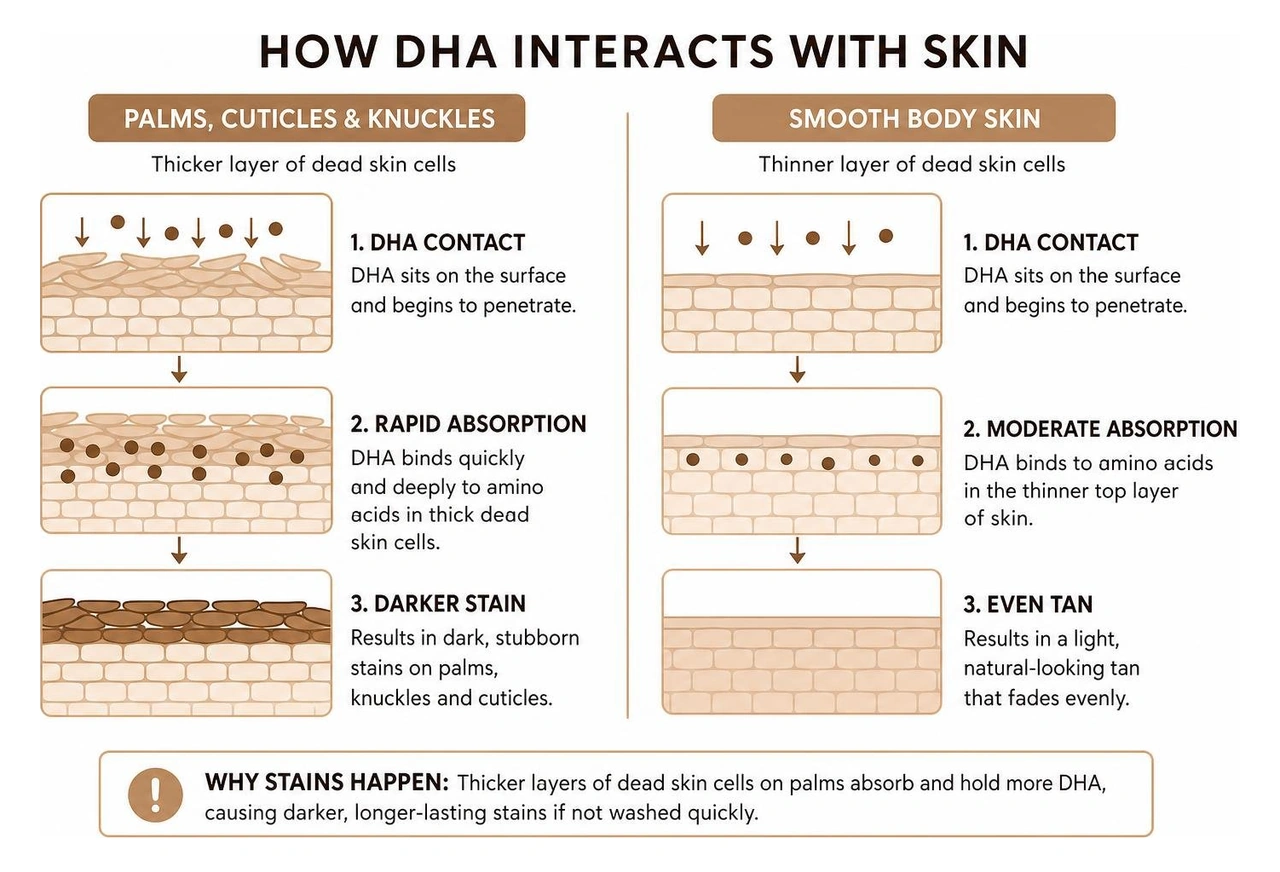
Self-tanning formulas contain dihydroxyacetone (DHA), which reacts with amino acids in the stratum corneum (the outermost skin layer). Because the skin on your palms, cuticles, and knuckles contains thicker layers of dead skin cells than the rest of your body, DHA binds rapidly and deeply to these spots.
If you skip using an applicator or delay washing your hands, these areas quickly develop dark, unnatural stains. Knowing these mechanics is part of our key Tips for Avoiding Common Self-Tanning Mistakes. Applying barrier lotion to dry areas and keeping damp towels nearby helps prevent unwanted staining if you choose to tan without a mitt.
What Are the Best Household Alternatives if You Don't Have a Tanning Mitt?
If you find yourself without a mitt, you do not have to resort to bare hands. There are several household items that work well as temporary substitutes. In our review of How to Apply Fake Tan Without a Mitt (6 Methods) | Talking Tan , everyday materials can bridge the gap while helping you protect your hands and achieve an even tone.
Using Rubber Gloves or Latex Gloves for Maximum Product Savings
Rubber kitchen gloves or disposable latex and nitrile gloves are among the best non-mitt alternatives. Because synthetic rubber is completely non-porous, it does not absorb a single drop of product.
- Zero product waste: Every pump of tanner stays on your skin rather than soaking into fabric.
- Enhanced dexterity: Individual fingers let you maneuver around small joints like the backs of knees and elbows easily.
- Streak prevention tip: Work in quick, overlapping circular motions so liquid spreads evenly before setting.
Using Inside-Out Socks or Cling Wrap in a Pinch
When gloves aren't available, two simple household items can step in:
- An inside-out thick sock: Turning a clean, plush slipper sock inside out exposes a soft, terry-loop fabric that closely mimics a velvet mitt. Wear it like a glove to sweep product across your legs and arms.
- Cling wrap / plastic wrap: Smoothly wrap plastic cling wrap around your dominant hand, securing the edge around your wrist with a small piece of tape. This creates an instant waterproof shield that keeps your palms completely clean.
Using Makeup Brushes and Sponges for Tricky Areas
For detailed blending around hands, feet, and ankles, household makeup tools offer incredible precision. A dense kabuki brush or a slightly damp makeup sponge works beautifully for buffing self-tanner across uneven contours.
In fact, beauty coverage on How to fake tan your hands without it going patchy and why you should never use a mitt for your fingers notes that large mitts can deposit too much product onto small finger joints. Using a damp makeup brush or sponge allows you to lightly feather product across knuckles for a seamless blend.
How Do You Safely Apply Self-Tanner with Bare Hands Without Staining?
If you prefer using your hands or have no other tools available, you need a disciplined technique to avoid orange palms. For a broader overview, check our guide on whether Shoud I Use a Tanning Mitt to Apply Self-Tanner.
Skin Preparation and Pre-Tan Hydration
Proper skin preparation is essential when applying self-tanner with bare hands. Follow these foundational steps outlined in our guide on Best Practices for Prepping Your Skin Before Applying Self-Tanner:
- Exfoliate early: Scrub your body thoroughly 24 hours prior to tanning to clear away loose, dry skin cells.
- Rinse cold: Finish your shower with cool water to close open skin pores before application.
- Apply barrier cream: Coat your palms, cuticles, fingernails, elbows, knees, and ankles with an oil-free moisturizer before applying any self-tanner. This slows down formula absorption in high-risk areas.
Step-by-Step Bare Hand Technique and Washing Schedule
To safely use bare hands, you must wash them repeatedly throughout the application process:
- Dispense onto the body: Apply self-tanner directly onto your leg, arm, or torso rather than pumping it straight into your palm.
- Buff in sections: Use the flats of your fingers and palms to blend the product in sweeping circular movements over one single section.
- Wash immediately: Stop instantly after each section. Wash your palms, wrists, finger webs, and cuticles with warm water and soap.
- Repeat across the body: Move section by section (left leg, right leg, torso, arms), washing your hands thoroughly between each area.
- Dilute before the final rinse: Once finished, massage a small pump of body lotion into your hands to dilute any lingering active ingredients before giving your palms one last scrub.
How to Clean Off and Remove Self-Tanner Stains from Palms
If you notice your palms taking on color post-application, act quickly:
- Immediate cleanup: Wipe palms and fingernail beds with a makeup remover wipe or a damp washcloth immediately after finishing your application.
- Treating dark spots: If color develops overnight, gently massage an exfoliating scrub onto your palms.
- Chemical exfoliation: Apply a facial serum containing alpha-hydroxy acids (AHAs) or beta-hydroxy acids (BHAs), such as glycolic acid, to dark spots on your palms to accelerate skin cell turnover and fade the stain.
When using reusable tools later on, keeping them clean is just as important—see How to Clean Your Tanning Mitt for easy maintenance steps.
How Do You Achieve a Natural, Streak-Free Glow on Hands, Feet, and Joints?
Tanning tricky joints requires a light touch and proper preparation. If you want to master a Self-Tan Without Streaks, unnatural orange tones or dark spots don't stem from DHA itself. Instead, orange tones happen from overapplication, dry skin, poor prep, or choosing a shade too deep for your starting skin tone.
Mastering Delicate Application on Fingers and Knuckles
Your hands and feet naturally dry out faster than the rest of your body, causing them to grab excess pigment. To keep coverage light and natural:
- Leave hands and feet for last: Never apply fresh pumps of self-tanner directly to your hands, feet, or knuckles.
- Use residual product: Complete your entire body first. Then, use only the leftover residue remaining on your tool to sweep lightly over your wrists, ankles, and tops of feet.
- Fan out fingers: Bend your fingers into a loose claw shape to stretch the skin over your knuckles, ensuring the product blends into fine lines rather than settling on top.
- Blend with the clean side: If using an applicator, flip it over and use the clean side of The Mitt to buff away excess product from dry joints.
Matching Your Application Method to Your Self-Tanner Formula
Different formulas pair best with specific application tools. Understanding how your product works helps you select the right technique:
- Tinted Tanning Waters: Formulas like our Life Proof Tan are water-light, quick-drying, sweat-resistant, transfer-resistant, and non-orange. Enriched with argan oil, cucumber oil, caffeine, and guarana extract, this vegan, cruelty-free formula (free from parabens and sulfates) glides on easily. It pairs perfectly with The Mitt, which is double-sided, washable, and designed for even control.
- Tanning Drops: If you prefer customizable color for your face or body, Tanning Drops offer a lightweight feel enriched with rosehip oil and cucumber extract. Vegan and free from parabens, palm oil, and sulfates, these drops are quick-drying and blend smoothly when mixed into your favorite oil-free moisturizer using bare hands or a damp cosmetic brush. Read our full guide on How to Apply Self-Tanning Drops for precise steps.
- No foams or spray guns required: At 3VERYBODY, we do not offer mousse/foam, tanning beds, or salon spray-gun services. We focus strictly on water-light, comfortable formulas that fit seamlessly into your at-home routine.
If you are just getting started and trying to decide on the best formula for your routine, we strongly recommend The Kit as the best fit for beginners, or review our guide on What Self-Tanner Should I Buy for My First Time.
What Are the Most Frequently Asked Questions About Tanning Mitts vs. Hands?
Will self-tanner always stain my hands if I don't use a mitt?
Without a mitt or protective gloves, the risk of staining your hands is very high. Because the skin on your palms and cuticles is thicker and dryer, it rapidly absorbs active tanning ingredients. While you can reduce staining by washing your hands with soap after every single body section, using a protective barrier remains the most reliable way to keep palms clean.
Can I use a regular washcloth or dish sponge instead of a tanning mitt?
We do not recommend using rough washcloths or kitchen dish sponges. Rough towels absorb too much liquid, wasting product and leaving harsh fabric drag lines across your skin. Dish sponges often feature harsh textures that scratch the skin and cause uneven, patchy pooling. Soft microfiber pads, inside-out slipper socks, or smooth rubber gloves make far better substitutes.
How long does a self-tan last when applied with hands versus a mitt?
A self-tan typically lasts about a week with proper care (around 5 to 7 days), regardless of whether you used bare hands or a mitt. However, using a double-sided applicator helps support an even fade because it spreads product in a uniform layer without dense patches.
To care for your tan daily:
- Hydrate gently: Apply an oil-free moisturizer daily to support an even fade.
- Sweat protection: Dusting a small amount of baby powder in high-sweat areas (like inner elbows or behind knees) helps absorb moisture and reduce friction.
- Avoid harsh stripping: Steer clear of heavy scrubbing, hot showers, and drying cleansers, which can cause patchy wear over time.
Conclusion: Which Application Method Is Right for You?
While you can apply self-tanner with bare hands by following a strict washing schedule, using a dedicated applicator makes the process faster, cleaner, and far easier to control. Bare hands carry a constant risk of dark palms, while non-porous household alternatives like rubber gloves save product but require rapid blending.
For an effortless routine, pairing a water-light formula with a double-sided applicator gives you the smoothest experience.
Ready for an easy, natural-looking tan? Explore our complete line at 3VERYBODY, including our quick-drying Life Proof Tan, customizable Tanning Drops, washable The Mitt, or get everything together in The Kit.